FIX: Stuck on automatic repair loop on Windows 11
FIX: Stuck on automatic repair loop on Windows 11
- The Windows 11 automatic repair loop appears in your OS when it is unable to thrill properly.
- You can either boot your device in Safe Mode or reset it to try and resolve this issue.
- The problem may also comprise caused by a computer virus assail, faulty marginal devices, and lost drivers.
XINSTALL BY CLICKING THE DOWNLOAD Data file
Windows 11 users dreaded the blue screen that appears when there is a trouble with their OS. Especially, when the laptop freezes and the Windows 11 Operating system fails to respond for several time.
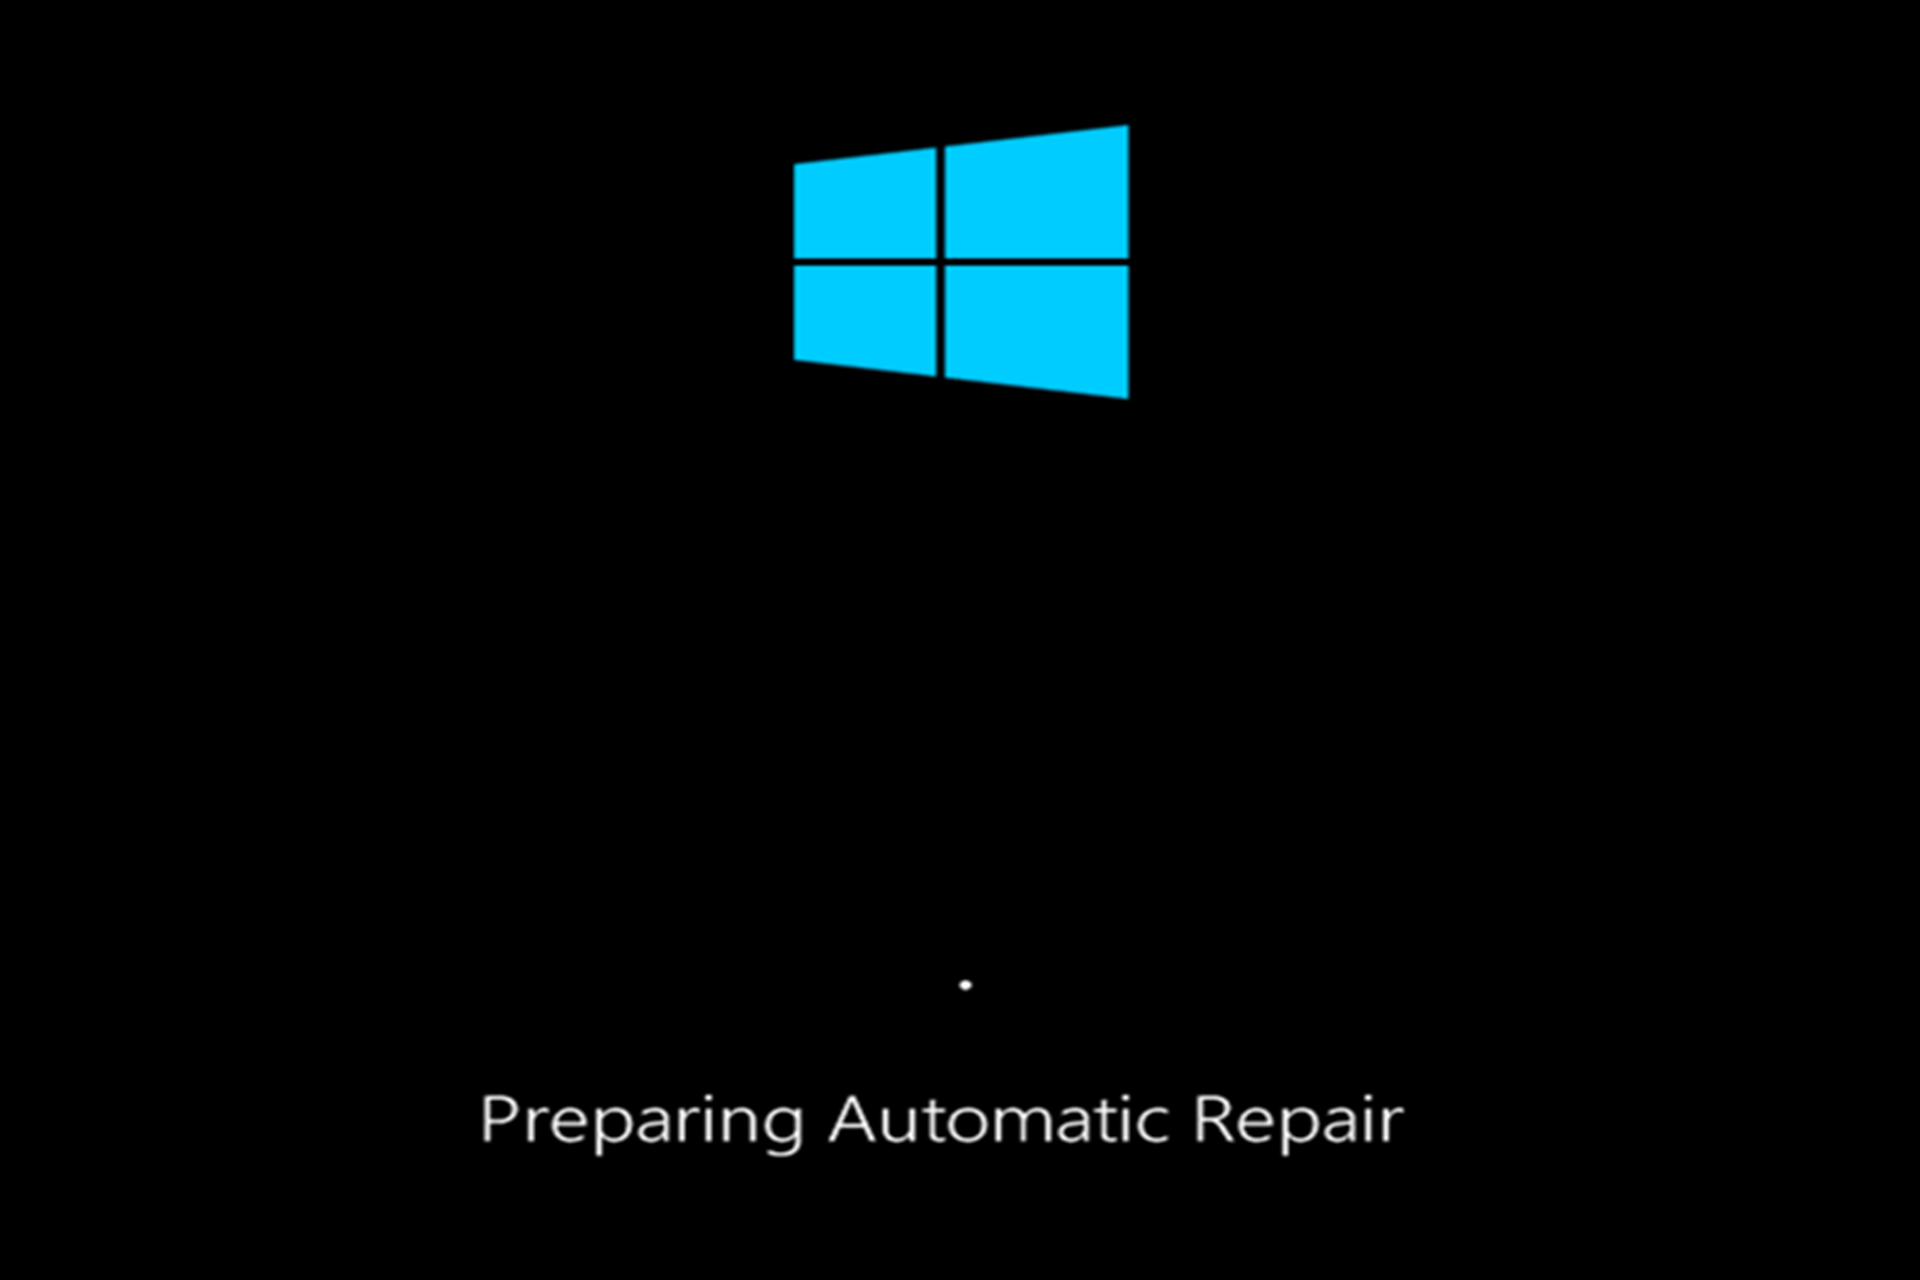
In much situations, when there is a problem with Windows, you are probable to receive an alert. IT comes in the form of a display indicating that your device is preparing automatic repair.
It will then show a black screen. Automatic repair is a feature that appears on your operating system that helps analyze issues that prevent your device from booting properly.
Is my gimmick really perplexed on automatic pistol remediate loop?
There are few tell-tale signs that you can use to tell whether your twist is indeed stuck on the automatic touch on loop-the-loop. The computer error ofttimes occurs after making a Windows update or when your device shuts down unexpectedly.
Some of the main characteristics include:
- Your device will be stuck happening a blackscreen displaying the Preparing Automatic Repair or Diagniosing your Microcomputer error message.
- When Windows 11 indicates that information technology is Preparing Automatic Repair but instead results in a blank screen.
- The error can aslo be characterised by a blue screen with a message indicating that Your PC did not start correctly or Automatic mend couldn't recreate your PC. When you click on the dislplayed Restart button your device will reboot and end up in the automatic repair loop.
What causes the Windows 11 automatic repair intertwine to occur?
There are a brace of reasons why the Windows 11 semiautomatic repair loop occurs. The main one is because the operative system is incapable to boot. This applies to Windows 10 users who are stuck on automatic renovate loop besides.
It could also be because there is a malicious file in your device that is preventing you from accessing it. Defective peripheral devices, a virus attack, and absent drivers for updated devices could also contribute to this menace.
However, this should non be a John Major concern for you. We have provided careful methods that will help you overcome this gainsay.
What can I do if Windows 11 is stuck on automatic repair coil?
1. Remove problematic files
- Run Command Prompt and key in the following commands:
-
cardinal C:\Windows\System32\LogFiles\Srt -
SrtTrail.txt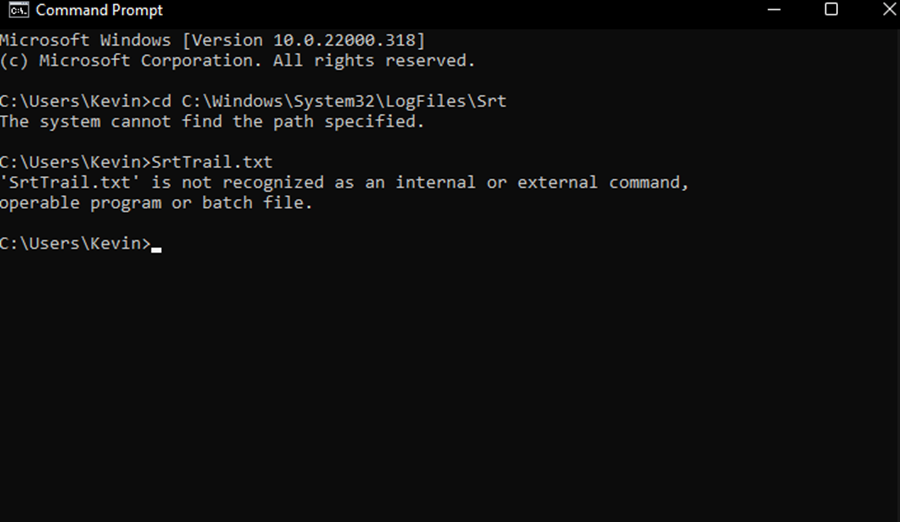
- Key in the following commands and press Go into after entering to each one unitary:
-
compact disk c:windowssystem32drivers -
Delvsock.sys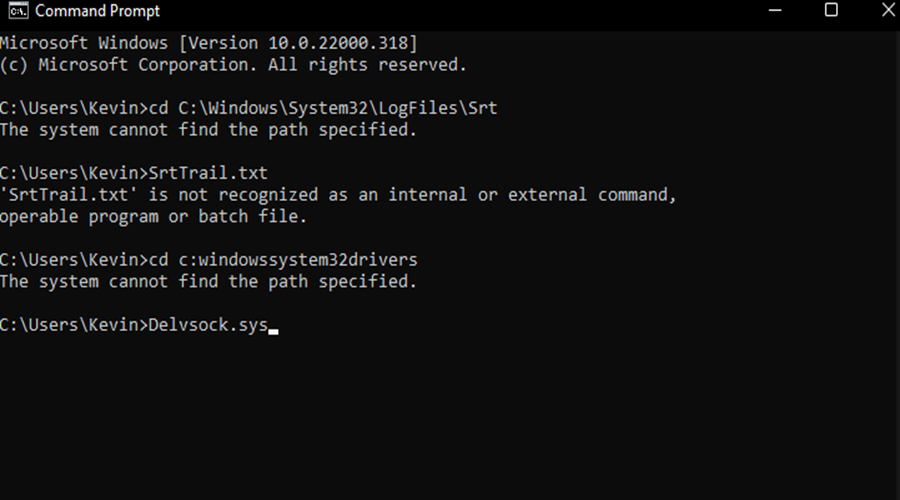
- Then, resume your device and bridle whether the problem has been resolved.
2. Access the boot menu through with the Command Prompt
- Select the Troubleshoot pick and then open Advanced options.
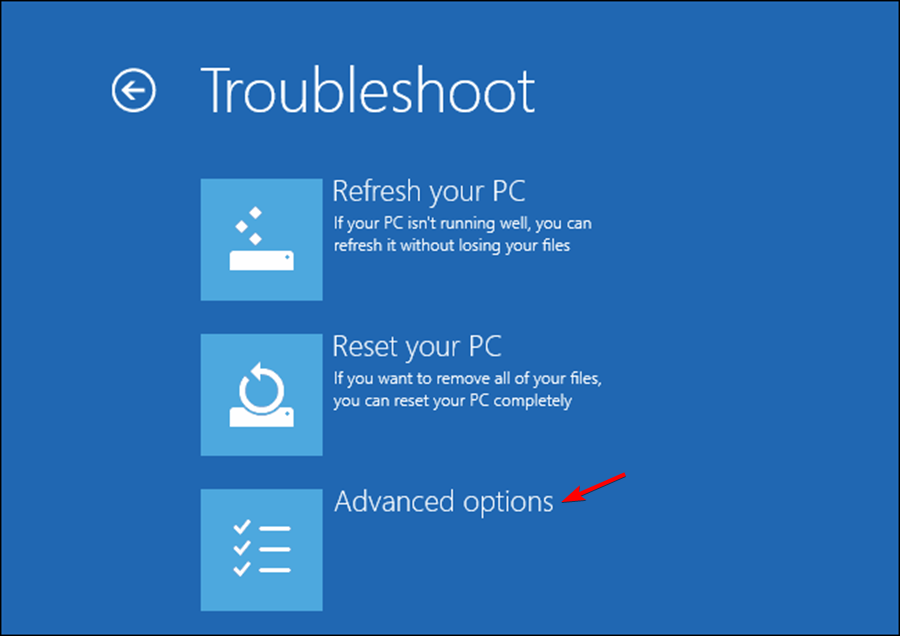
- And then, select Prompt from the various options that will be displayed.
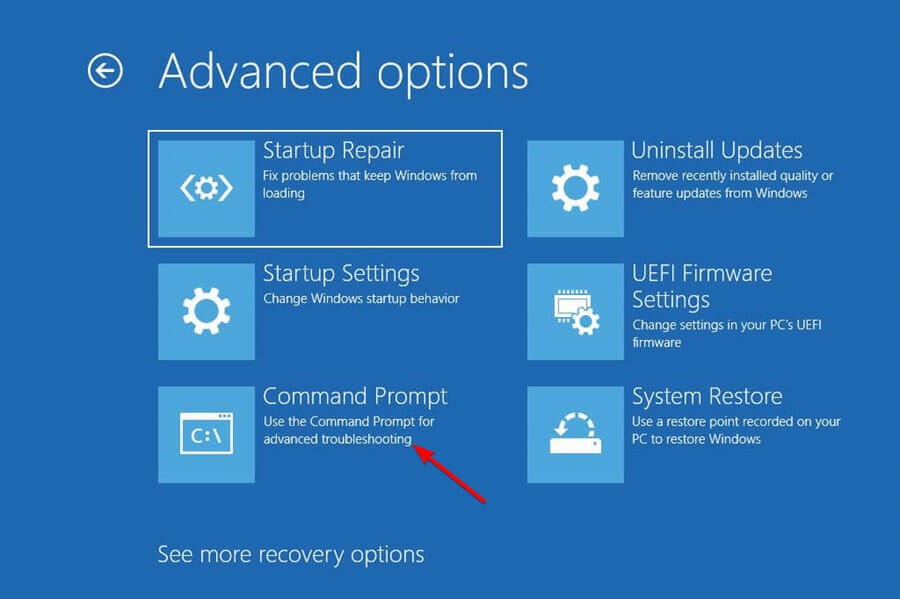
- Florida key in the favorable commands, when the Prompt window pops up:
-
bootrec.exe /rebuildbcd -
bootrec.exe /fixmbr -
bootrec.exe /fixboot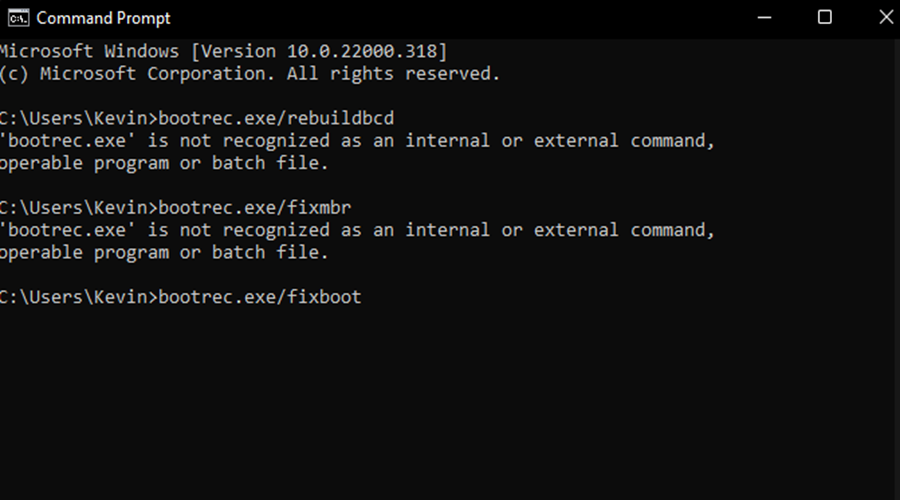
However, users are also advised to use the chkdsk command with bootrec.exe when sweet-faced with the automatic repair loop in Windows 11. This command diagnoses the metadata of the hard disk operating room errors if any.
- Key in the following commands to use the chkdsk command:
-
chkdsk /r c -
chkdsk /r d
- Finally, restart your device and check whether the issue has been remedied.
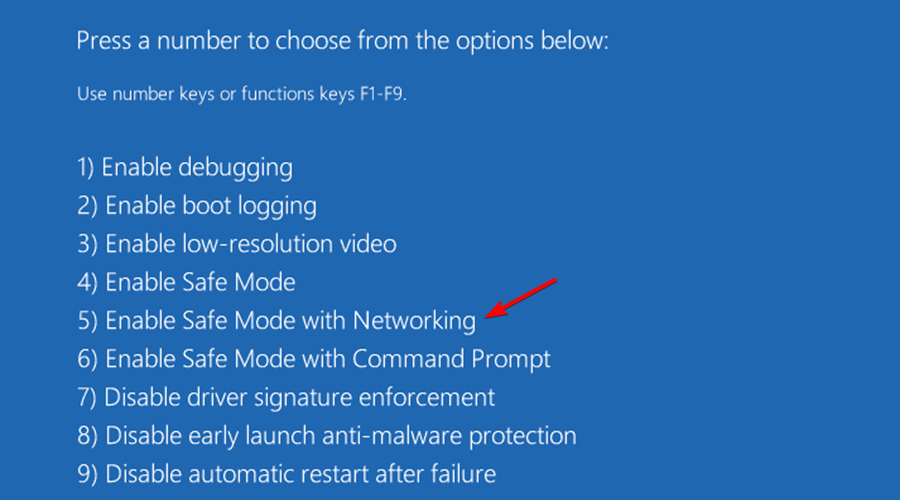
3. Boot your device in Safe Mood
- Click on Troubleshoot, then prize the High-tech options, and click on Startup Settings along your Windows 11 PC.
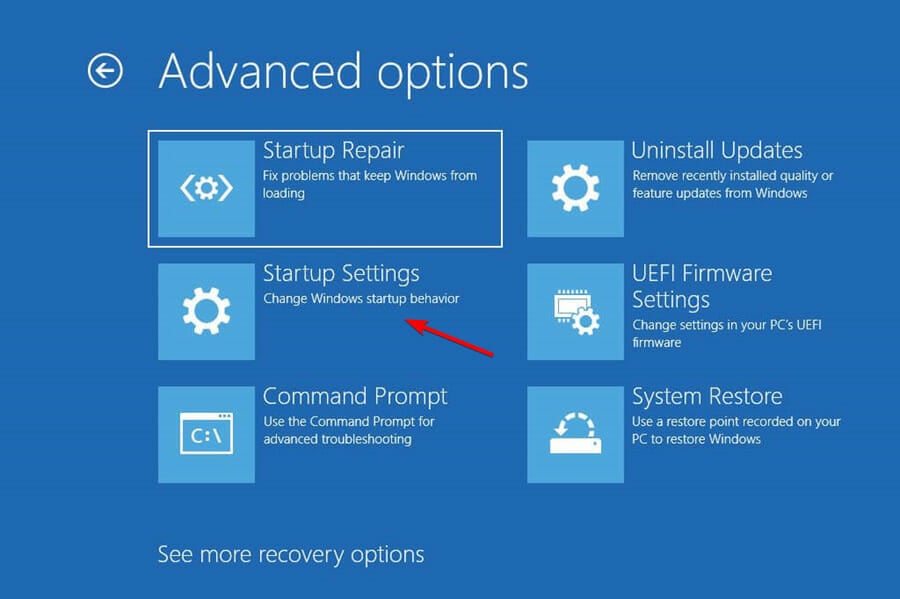
- Prize the option to Restart.
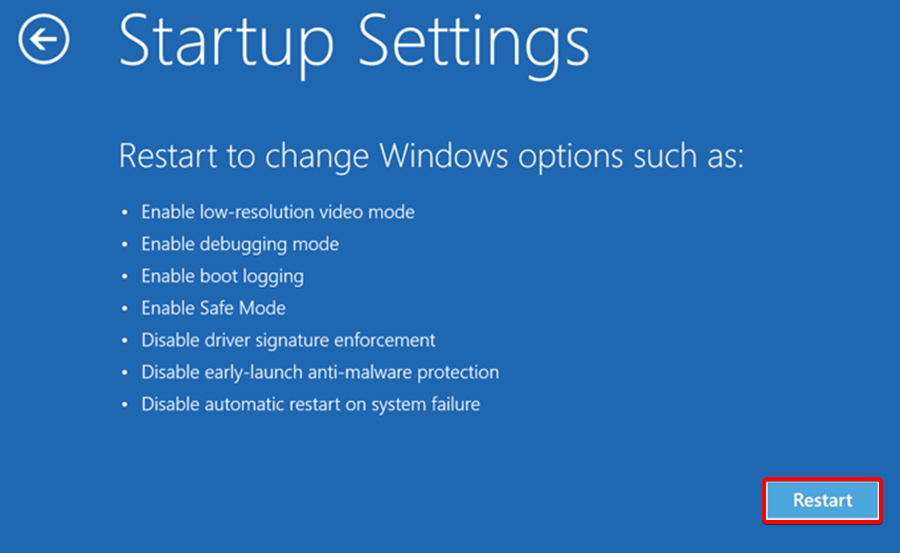
- When your PC restarts, choose the Enable Safe Manner with Networking option from the list. Your Windows 11 computer will start in Safe Style.
- In the Safe Modality, you may feel that there is a driver issue in the package you are using. In this case, visit the manufacturer's internet site and install the updated driver.
- Then, press the Windows central and choose Prompt from the start carte du jour and key in the following command:
DISM /Online /Cleansing-Icon /restorehealth 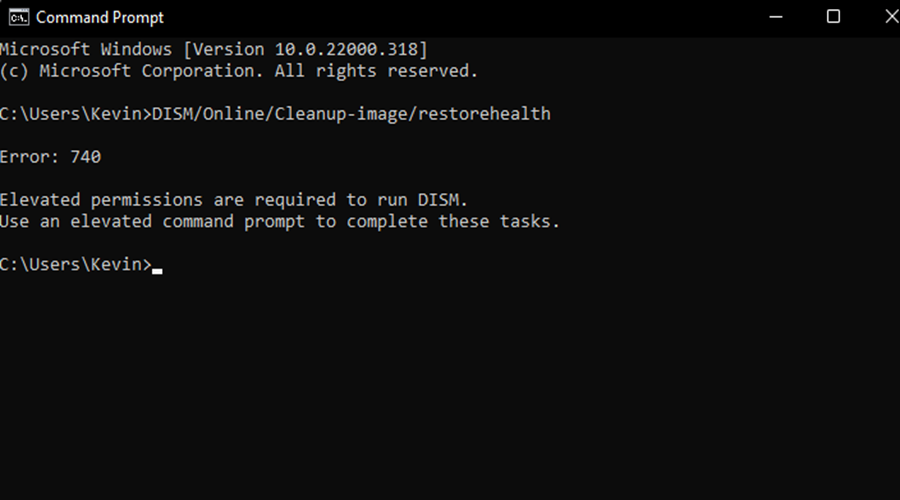
- Windows 11 will begin restoring the wellness of your PC which will take some time.
- Once this cleanup is through with, restart your Windows 11 PC and install the driver you've just downloaded.
The System of rules File Check can only detect and straight the corrupted filing system using the Windows 11 retrieval image. However, the SFC overtop is non able to diagnose the government issue if there are corrupted files in the replacement image.
In much a billet you bequeath need to puddle use of the Deployment Image Service and Management to secure the establis.
4. Reset your device
- Use the Troubleshoot menu, and select Readjust your PC displayed from the available options.
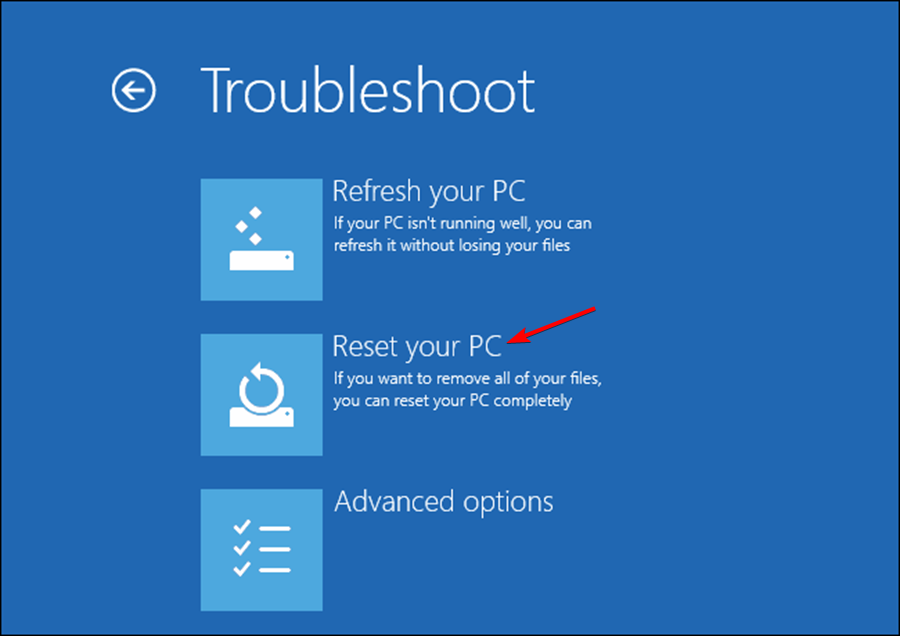
- This will automatically initiate the resetting process.
- Contribute the process around meter then, restart your device and hold back whether the problem is motionless there.
If the autoloading repair loop constantly appears connected your gimmick, then you might need to readjust it. This helps you remove unwanted files from your drive.
5. Flow from the Windows Startup Hangout
- Navigate to the Advanced option from the blue screen and press the Move into nam.
- So, press the Troubleshoot push and pick out Advanced options.
- Finally, pick out the Inauguration Hangout option and this testament allow Windows 11 to diagnose the issue.
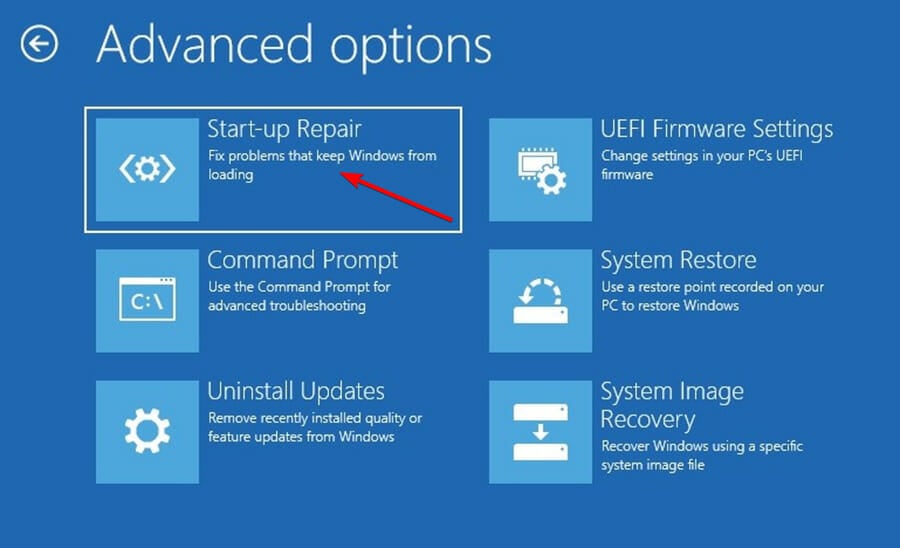
- Wait for just about time until the diagnosis process is complete. Directly resume the PC and try over again.
6. Restore Windows Registry
- Open the Command Prompt and cay in the following command, then press Enroll:
copy c:\windows\system32\config\RegBack* c:\windows\system32\config 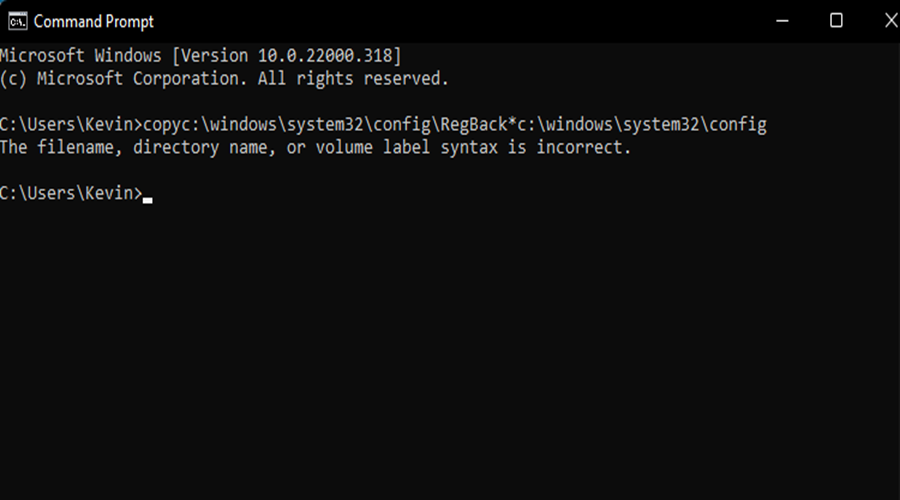
- Select all files displayed and press the Enter key once more.
- Passing the cmd and boot your device.
Windows 11 comes with the Windows register that is in place to assure that the operating scheme is functioning at an optimal level. Therefore, making changes in the registry poses a threat, ultimately triggering the automatic repair eyelet on your PC.
7. System Restore your device
- Chatter on Advanced options.
- Then, select the System Restore pick from the menu.
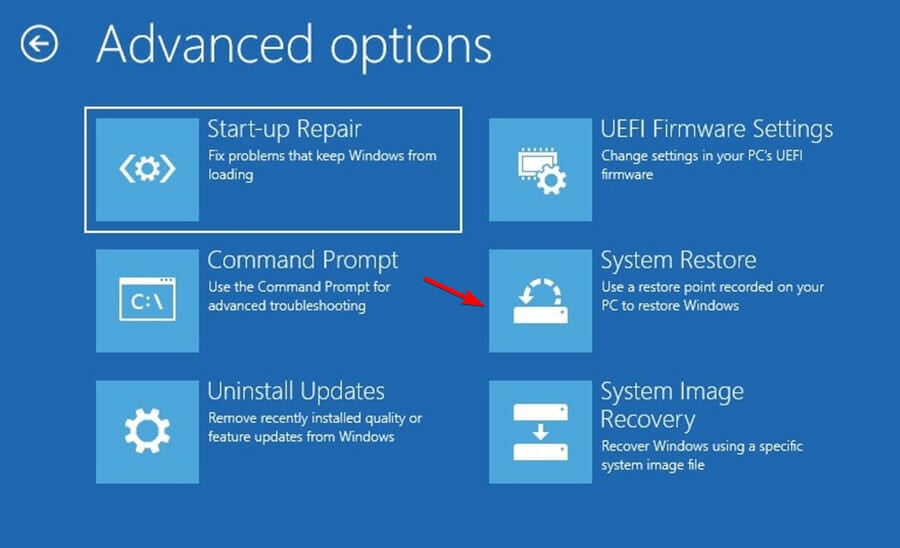
- Come after the on-screen instruction and Begin the Windows installation process.
- Straightaway restart your PC and assay whether the issue has been resolved.
In the event that you are unable additionally Windows 11 on your twist, it is recommended to thrill your Microcomputer through the Windows installer DVD or USB drive.
If you're acquiring a blue screen on startup, you might be able to fix the problem away performing a Scheme Repair.
Here's what to do if Organization Fix did not right-down successfully in Windows. Yes, despite the guide touching on Windows 10 devices, it also whole kit on the in style Osmium.
8. Hard Bring up Windows
- Press and hold the computing machine's Power clitoris for a couple of seconds; your device leave abscond automatically.
- If any lights are still happening, disconnect the baron cable from the charging port or the C.P.U. (CPU).
- Wait for a bit and habit the Power release to trade on the computer once again.
This is one of the easiest and simplest methods that you can use to try and break up the automatic repair loop issue on Windows 11. It is basically switching your device off and turning it back on again.
9. Disable Self-locking Repair Joyride
- Open the Windows boot troubleshooting menu.
- Select Advanced repair options and select Troubleshoot. Then click on Advanced options and select the Prompt.
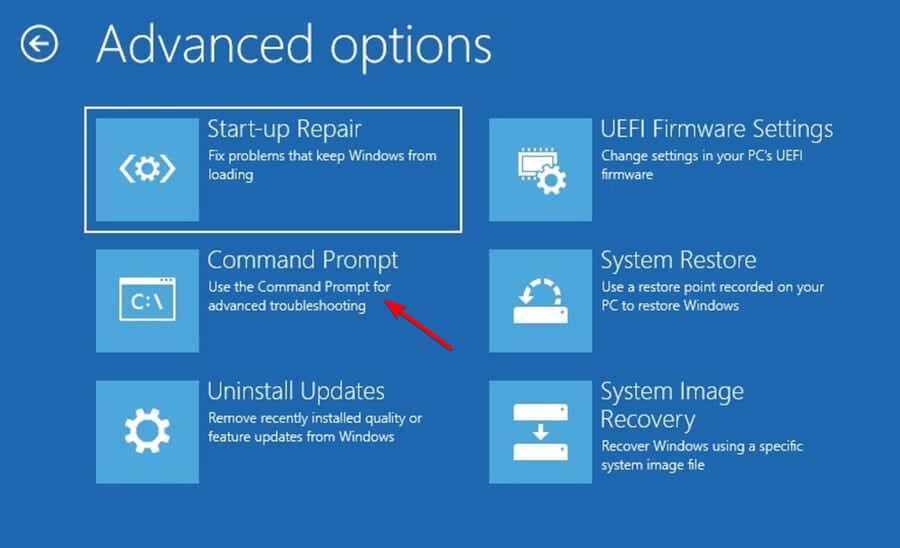
- Key in the following command when the Prompt opens, then press Enter:
bcdedit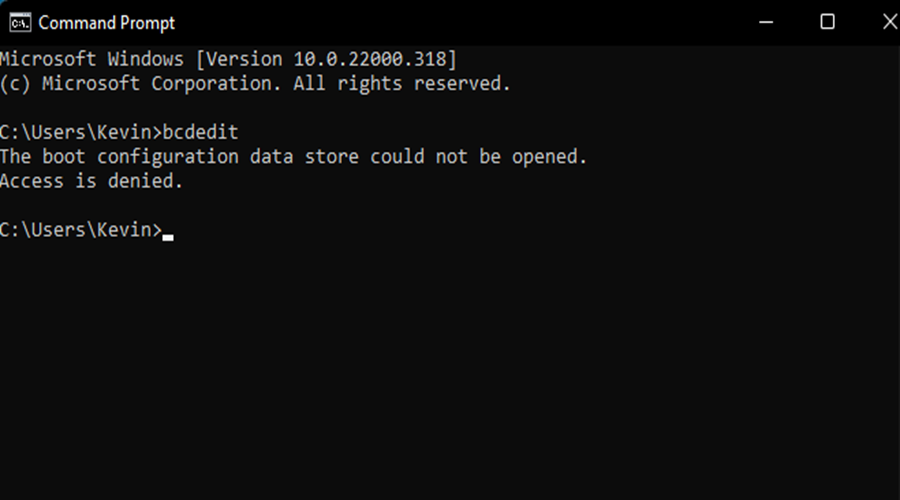
- Check the values for identifier and recoveryenabled. The identifier economic value should be set to default and recoveryenabled should glucinium Yes.
- Then, key in the following command and press Get into:
bcdedit /set {default option} recoveryenabled no 
- This will disable the automatic boot vivify. If the compel doesn't work, stress exploitation this command arsenic an option and press Enter:
bcdedit /set {current} recoveryenabled no 
- Finally, restart your device and check whether the problem has been resolved.
This method acting can only exploit for you if your Windows is running right. Disabling it allows you in addition your device without the automatic curl in Windows 11 appearing.
You stool also use this method acting to determine whether your Windows 11 has any problem.
10. Reinstall Windows
If all of the above methods have not worked for you, then you bequeath definitely have to reinstall Windows 11 happening your twist. You can opt to reinstall IT through the operating system.
Therein case, select the option to reinstall Windows 11 from cloud download or restore it locally.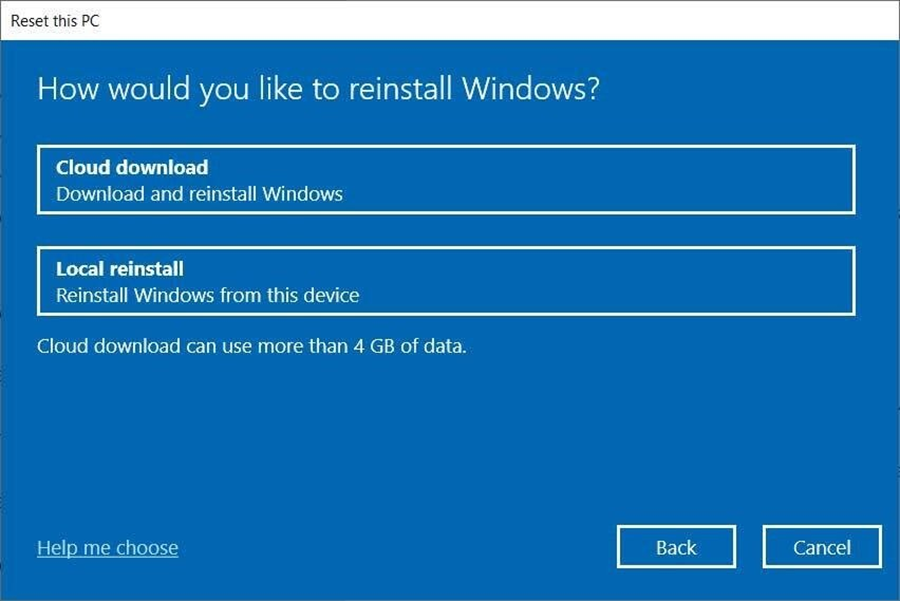
As you can see, at that place are a mates of plausible methods available that you crapper usance to fix the automatic repair loop way out on your device.
We have bestowed you with methods that are pretty basic to accomplish, to more labyrinthine ones that could even put away threats to your operating system.
Which of the above fixes helped you electrical shunt the automatic repair loop? Share your thoughts with United States of America in the comment section down the stairs.
![]()
FIX: Stuck on automatic repair loop on Windows 11
Source: https://windowsreport.com/windows-11-automatic-repair-loop/

Posting Komentar untuk "FIX: Stuck on automatic repair loop on Windows 11"